

- Software Engineer, Product
- Modern Technology stacks:
- So What is a Tech Stack?
- Frontend tech stack
- Backend tech stack
- How to choose/build a tech stack
- What is a CI/CD Pipeline?
- Software Business Analyst
- Node.js Express Back-end Overview
- Build React App With Java Backend
- Connecting React-Frontend and NodeJS/Express Backend Applications
- React-Frontend, Node.js/Express-Backend, MySQL Architecture
- React Frontend with a NodeJS/Express Backend SQL-Architecture
- So What is git ?
- Git vs GitHub
- Big O Notation


Git Cheat Sheet > Step by step
So what is Git, really?
Git is a version control system that lets you manage and keep track of your source code history.
Git is a Software that handles source code versioning, letting you make and track local file changes and share changes with a remote repository.
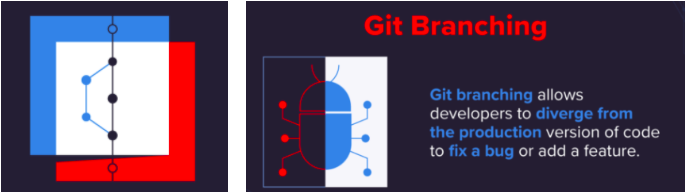
Git lets you branch out from the original code base. This lets you more easily work with other developers, and gives you a lot of flexibility in your workflow.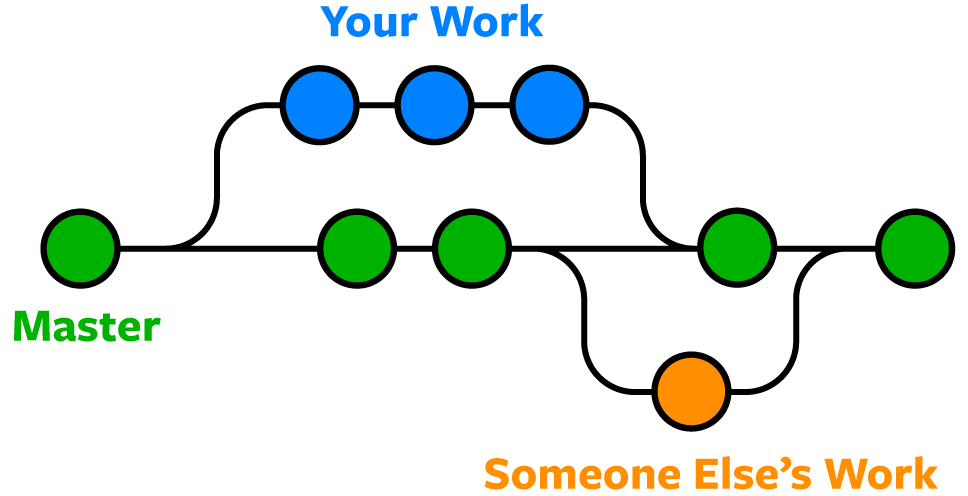
This git cheat sheet covers: creating github repos, pushing & pulling, cloning, forking, making pull requests, and open-source contribution workflows.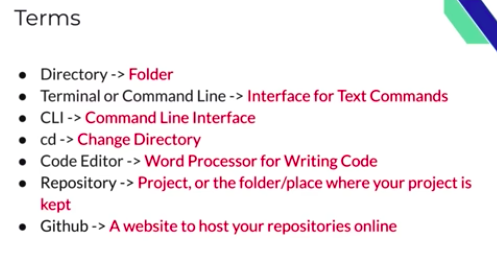
 ::::::::: An Intro to Git and GitHub::::::
Follow the steps below to get comfortable making changes to the code base, opening up a pull request (PR), and merging code into the primary branch. Any important git and GitHub terms are in bold with links to the official git reference materials.
Follow the instructions here to install git (if it's not already installed). Note that for this tutorial we will be using git on the command line only. While there are some great git GUIs (graphical user interfaces), I think it's easier to learn git using git-specific commands first and then to try out a git GUI once you're more comfortable with the command. A note: 95% of other online git resources and discussions will also be for the command-line interface.
Once you've done that, create a GitHub account here.
When creating a new project on your local machine using git, you'll first create a new repository (or often, 'repo', for short).
To begin, open up a terminal and move to where you want to place the project on your local machine using the cd (change directory) command. For example, if you have a 'projects' folder on your desktop, you'd do something like:
[ hjs-MacBook-Air-2:hj$ mkdir hj-project ]
[ hjs-MacBook-Air-2:hj$ cd hj-project ]
[ hjs-MacBook-Air-2:hj-project hj$ git init ]
To initialize a git repository in the root of the folder, run the git init command:
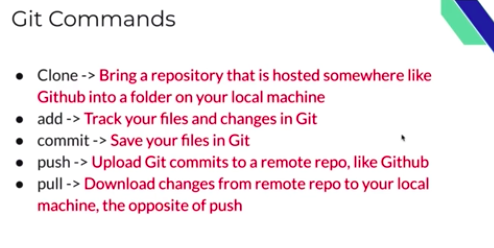
Once you've added or modified files in a folder containing a git repo, git will notice that the file exists inside the repo. But, git won't track the file unless you explicitly tell it to. Git only saves/manages changes to files that it tracks, so we’ll need to send a command to confirm that yes, we want git to track our new file.
Adding file to your git repository
[ git add [file_name ] ]
[ git commit -a -m " initial version - Message - " ]
[ git status ] //Always a good idea, this command shows you what branch you're on, what files are in the working or staging directory, and any other important information.
[ touch foo.text ] // to create a file
[ rm foo.text ] // to remove a file
[ git log ] // a list what commits have been made
- Making changes and Tracking them
[ git status ] // To check , if files are added
[ git commit -a -m " message " ] //save your files in git
[ git log ] //Browse and inspect the evolution of project files.
1 - [ create repository GitHub.com/ your account ]
2 - [ git remote add origin git@github.com/jaa-Hassan/file_name.git ]
3 - [ git push -u origin master ]
//Uploads all local branch commits to the remote....>> is used for pushing local content to GitHub.
//git push -u origin master git@github.com/Jama-Hassan/2gole.git
4 - git remote remove origin
// git remote add origin git@github.com/jama-Hassan/features-N30-21.git
You'll also see the option to Clone from GitHub. Once you authenticate with your GitHub account in VS Code, you'll be able to search through repositories by name, and select any repo to clone it. You can also start the flow to clone a Git repository with the Git: Clone command in the Command Palette.
Step-1
git clone https://github.com/TattyFromMelbourne/react-calculator
Step-2
cd react-calculator
Step-3
npm install
To run in development mode:
npm start
Branches allow you to move back and forth between 'states' of a project. Official git docs describe branches this way: A branch in Git is simply a lightweight movable pointer to one of these commits.' For instance, if you want to add a new page to your website you can create a new branch just for that page without affecting the main part of the project. Once you're done with the page, you can merge your changes from your branch into the primary branch. When you create a new branch, Git keeps track of which commit your branch 'branched' off of, so it knows the history behind all the files.
After running the above command, you can use the git branch command to confirm that your branch was created:
To retrieve the branch from the remote repository, use git pull against the origin and specify the name of the branch.
If you check available local branches, the new branch doesn't appear automatically.
However, you can check out the branch and begin working on this new branch.
Without [ git pull ], (or the effect of it,) your local branch wouldn't have any of the updates that are present on the remote.
In order to get the most recent changes that you or others have merged on GitHub, use the git pull origin master command (when working on the primary branch). In most cases, this can be shortened to "git pull".
Note: [ git pull] : Update your local working branch with commits from the remote, and update all remote tracking branches.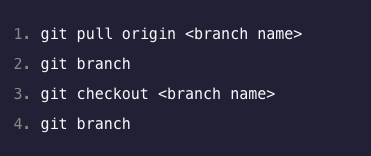
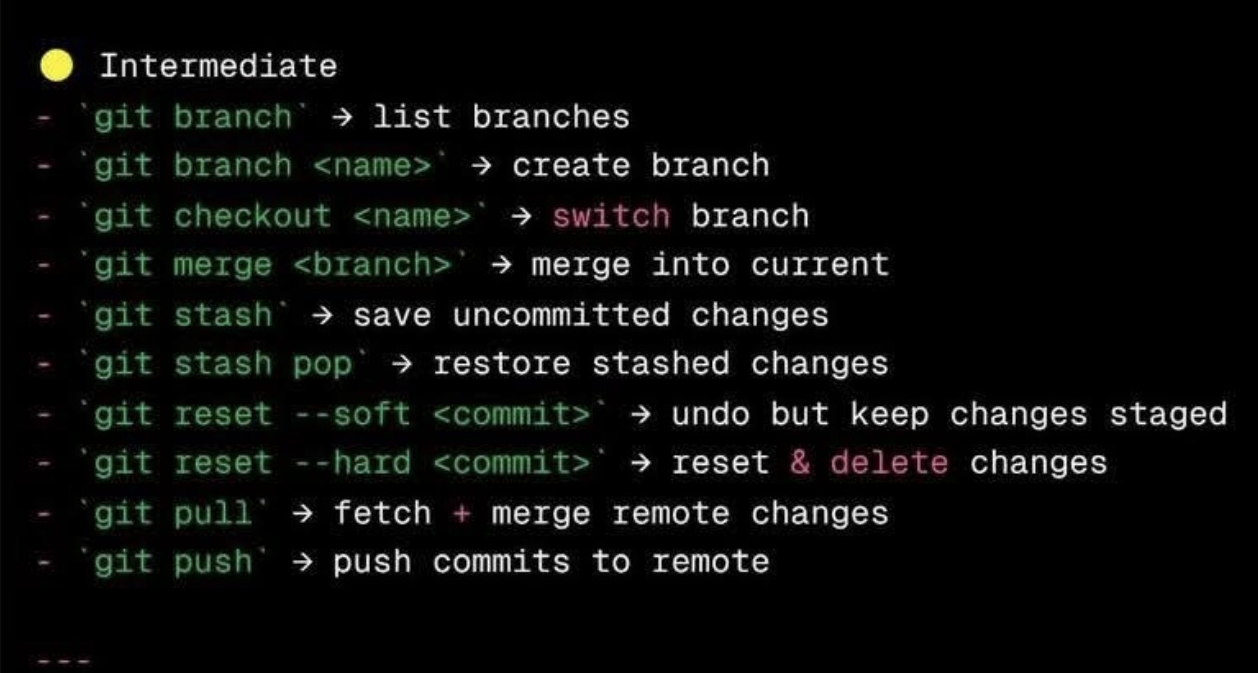
[ git branch ]: This shows the existing branches in your local repository. You can also use [ git branch [banch-name]] to create a branch from your current location, or [git branch --all] to see all branches, both the local ones on your machine, and the remote tracking branches stored from the last [ git pull ] or [ git fetch from the remote ].
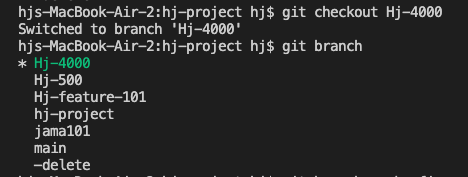
Switching or Creating a Branch from Another Branch using checkout
Creating branch Hj-4000 inside main [ git checkout -b Hj-4000 main ]
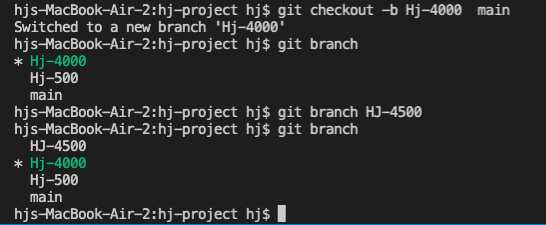
Switching to branch main [ git checkout Hj-4000 ] and [ git log ]
to pull down the new_feature branch from . After downloading, it will initiate a git merge.
Use cmd: [ git checkout main ] then [ git merge branch-name ]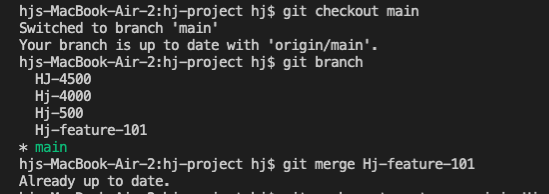
To create a new repo on GitHub, log in and go to the GitHub home page. You can find the "New repository" option under the "+" sign next to your profile picture, in the top right corner of the navbar:
After clicking the button, GitHub will ask you to name your repo and provide a brief description:
When you're done filling out the information, press the 'Create repository' button to make your new repo.
GitHub will ask if you want to create a new repo from scratch or if you want to add a repo you have created locally. In this case, since we've already created a new repo locally, we want to push that onto GitHub so follow the '....or push an existing repository from the command line' section:
[ git remote add origin https://github.com/Jama-Hassan/hj-project .git ]
Then [ git push -u origin main ]
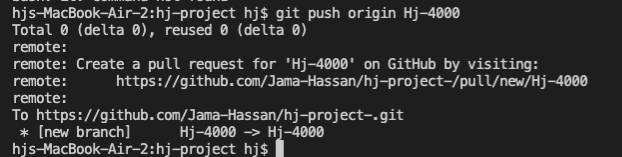
To push changes onto a new branch on GitHub, you'll want to run git push origin yourbranchname. GitHub will automatically create the branch for you on the remote repository:.
[ git checkout main ] then
[ git push origin my-new-branch ]
Useful when pushing a new branch, this creates an upstream tracking branch with a lasting relationship to your local branch
[ git checkout main ] then
[ git push --set-upstream origin Hj-feature-101 ]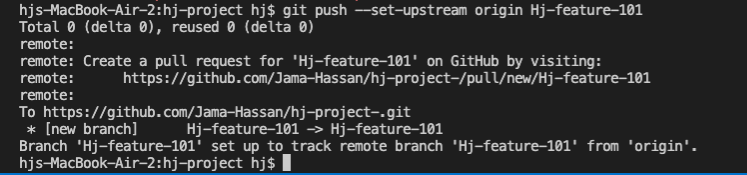
You might be wondering what that "origin" word means in the command above. What happens is that when you clone a remote repository to your local machine, git creates an alias for you. In nearly all cases this alias is called "origin." It's essentially shorthand for the remote repository's URL. So, to push your changes to the remote repository, you could've used either the command: git push git@github.com:git/git.git yourbranchname or git push origin yourbranchname
[ git pull --rebase ]: Update your local working branch with commits from the remote, but rewrite history so any local commits occur after all new commits coming from the remote, avoiding a merge commit.
Rebasing is prefered over merging. The --rebase option prevents unnecessary merge commits ensuring a linear history. There is a configuration option for pulling with --rebase due to its popularity.
run: [ git config --global branch.autosetuprebase always ]
After running, all git pull commands will be integrated via git rebase instead of git merge.
Let's assume another example that shows how to synchronize with the central repository's master branch using a rebase which will put your local changes on top of what everybody else has already done.
[ git checkout master ]
[ git pull --rebase origin ]

In most cases, it is simple to delete a Git branch. You'll learn how to delete a Git brach locally and remotely in this article.
// delete branch locally
[ git checkout develop ]
[ git branch -d localBranchName ]
// delete branch remotely
[ git checkout develop ]
[ git push origin --delete remoteBranchName ]

Repos often have a main branch for the main codebase and developers create other branches to work on different features.
Once work is completed on a feature, it is often recommended to delete the branch.
For example: [ git checkout main ]
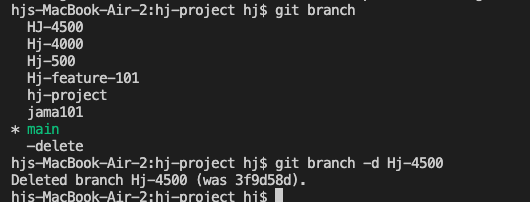
Delete a branch with git branch -d.
For example: [ git branch -d fix/authentication ]
The -d option will delete the branch only if it has already been pushed and merged with the remote branch. Use -D instead if you want to force the branch to be deleted, even if it hasn't been pushed or merged yet.
The branch is now deleted locally.
For example: [ git push origin --delete fix/authentication ]
The branch is now deleted remotely.
You can also use this shorter command to delete a branch remotely:
For example: [ git push origin :fix/authentication ]
If you get the error below, it may mean that someone else has already deleted the branch.
[[[ error: unable to push to unqualified destination: remoteBranchName The destination....... ]]]
Luckily, Git allows you to rename the branch very easily using the git branch -m command.
This guide explains how to rename local and remote Git branches.
[git checkout old-Hj-4000 ]
Rename the local branch by typing:
[ git branch -m new-name ]
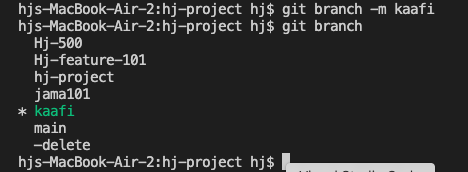
At this point, you have renamed the local branch.
If you've already pushed the branch to the remote repository , perform the next steps to rename the remote branch.
Push the [new_name] local branch and reset the upstream branch:
git push origin -u [new_name]
Delete the [old_name] remote branch:
git push origin --delete [old_name] That's it. You have successfully renamed the local and remote Git branch.
The first step is to rename the local "master" branch in your local repositories. You can do that easily with the following command:
$ git branch -m master main
Let's quickly check if this has worked as expected:
$ git status
On branch main
Your branch is up to date with 'origin/master'.
nothing to commit, working tree clean
Rename the master branch on your local machine with the command
[ git branch --move master main ].
Push the new main branch to the remote repository with the command
[ git push --set-upstream origin main].
In the second step, we'll have to create a new branch on the remote named "main" - because Git does not allow to simply "rename" a remote branch. Instead, we'll have to create a new "main" branch and then delete the old "master" branch.
Make sure your current local HEAD branch is still "main" when executing the following command:
[ git checkout main ]
$ git push -u origin main
We now have a new branch on the remote named "main". Let's go on and remove the old "master" branch on the remote:
$ git push origin --delete master
Easy option::: Go on the GitHub website to change the default branch.


Git is a version control system that lets you manage and keep track of your source code history.
Git is a Software that handles source code versioning, letting you make and track local file changes and share changes with a remote repository.
Git lets you branch out from the original code base. This lets you more easily work with other developers, and gives you a lot of flexibility in your workflow.
This git cheat sheet covers: creating github repos, pushing & pulling, cloning, forking, making pull requests, and open-source contribution workflows.
::::::::: An Intro to Git and GitHub::::::Follow the steps below to get comfortable making changes to the code base, opening up a pull request (PR), and merging code into the primary branch. Any important git and GitHub terms are in bold with links to the official git reference materials.
Step 0: Install git and create a GitHub account
The first two things you'll want to do are install git and create a free GitHub account.Follow the instructions here to install git (if it's not already installed). Note that for this tutorial we will be using git on the command line only. While there are some great git GUIs (graphical user interfaces), I think it's easier to learn git using git-specific commands first and then to try out a git GUI once you're more comfortable with the command. A note: 95% of other online git resources and discussions will also be for the command-line interface.
Once you've done that, create a GitHub account here.
Git and GitHub
A quick aside: git and GitHub are not the same thing. Git is an open-source, version control tool created in 2005 by developers working on the Linux operating system; GitHub is a company founded in 2008 that makes tools which integrate with git. You do not need GitHub to use git, but you cannot use GitHub without using git. There are many other alternatives to GitHub, such as GitLab, BitBucket, and "host-your-own" solutions such as gogs and gittea. All of these are referred to in git-speak as "remotes", and all are completely optional. You do not need to use a remote to use git, but it will make sharing your code with others easier.Step 1: Create a local git repository
When creating a new project on your local machine using git, you'll first create a new repository (or often, 'repo', for short).
To begin, open up a terminal and move to where you want to place the project on your local machine using the cd (change directory) command. For example, if you have a 'projects' folder on your desktop, you'd do something like:
[ hjs-MacBook-Air-2:hj$ mkdir hj-project ]
[ hjs-MacBook-Air-2:hj$ cd hj-project ]
[ hjs-MacBook-Air-2:hj-project hj$ git init ]
To initialize a git repository in the root of the folder, run the git init command:
Step 2: Add a new file to the repo
Go ahead and add a new file to the project, using any text editor you like or running a touch command. `touch newfile.txt` just creates and saves a blank file named newfile.txt.Once you've added or modified files in a folder containing a git repo, git will notice that the file exists inside the repo. But, git won't track the file unless you explicitly tell it to. Git only saves/manages changes to files that it tracks, so we’ll need to send a command to confirm that yes, we want git to track our new file.
Adding file to your git repository
[ git add [file_name ] ][ git commit -a -m " initial version - Message - " ]
- Finding out what's happening
After creating the new file, you can use the git status command to see which files git knows exist.[ git status ] //Always a good idea, this command shows you what branch you're on, what files are in the working or staging directory, and any other important information.
[ touch foo.text ] // to create a file
[ rm foo.text ] // to remove a file
[ git log ] // a list what commits have been made
- Making changes and Tracking them
[ git status ] // To check , if files are added [ git commit -a -m " message " ] //save your files in git
[ git log ] //Browse and inspect the evolution of project files.
- Synchronizing you local Git repository with GitHub
1 - [ create repository GitHub.com/ your account ]
2 - [ git remote add origin git@github.com/jaa-Hassan/file_name.git ]
3 - [ git push -u origin master ]
//Uploads all local branch commits to the remote....>> is used for pushing local content to GitHub.
//git push -u origin master git@github.com/Jama-Hassan/2gole.git
4 - git remote remove origin
// git remote add origin git@github.com/jama-Hassan/features-N30-21.git
Clone the repository from GitHub.
[ git clone [url] ]: Clone (download) a repository that already exists on GitHub, including all of the files, branches, and commits.You'll also see the option to Clone from GitHub. Once you authenticate with your GitHub account in VS Code, you'll be able to search through repositories by name, and select any repo to clone it. You can also start the flow to clone a Git repository with the Git: Clone command in the Command Palette.
Step-1
git clone https://github.com/TattyFromMelbourne/react-calculator
Step-2
cd react-calculator
Step-3
npm install
To run in development mode:
npm start
Create a new branch
Say you want to make a new feature but are worried about making changes to the main project while developing the feature. This is where git branches come in.Branches allow you to move back and forth between 'states' of a project. Official git docs describe branches this way: A branch in Git is simply a lightweight movable pointer to one of these commits.' For instance, if you want to add a new page to your website you can create a new branch just for that page without affecting the main part of the project. Once you're done with the page, you can merge your changes from your branch into the primary branch. When you create a new branch, Git keeps track of which commit your branch 'branched' off of, so it knows the history behind all the files.
Creating Branches Using Checkout
Let's say you are on the primary branch and want to create a new branch to develop your web page. Here's what you'll do: Run git checkout -b [ my branch name ] This command will automatically create a new branch and then 'check you out' on it, meaning git will move you to that branch, off of the primary branch.After running the above command, you can use the git branch command to confirm that your branch was created:
To retrieve the branch from the remote repository, use git pull against the origin and specify the name of the branch.
If you check available local branches, the new branch doesn't appear automatically.
However, you can check out the branch and begin working on this new branch.
Git Pull
[ git pull ] updates your current local working branch, and all of the remote tracking branches. It's a good idea to run git pull regularly on the branches you are working on locally.Without [ git pull ], (or the effect of it,) your local branch wouldn't have any of the updates that are present on the remote.
Create a pull request (PR)
A pull request (or PR) is a way to alert a repo's owners that you want to make some changes to their code. It allows them to review the code and make sure it looks good before putting your changes on the primary branch.Get changes on GitHub back to your computer
Right now, the repo on GitHub looks a little different than what you have on your local machine. For example, the commit you made in your branch and merged into the primary branch doesn't exist in the primary branch on your local machine.In order to get the most recent changes that you or others have merged on GitHub, use the git pull origin master command (when working on the primary branch). In most cases, this can be shortened to "git pull".
Note: [ git pull] : Update your local working branch with commits from the remote, and update all remote tracking branches.
[ git branch ]: This shows the existing branches in your local repository. You can also use [ git branch [banch-name]] to create a branch from your current location, or [git branch --all] to see all branches, both the local ones on your machine, and the remote tracking branches stored from the last [ git pull ] or [ git fetch from the remote ].
Switching or Creating a Branch from Another Branch using checkout
Creating branch Hj-4000 inside main [ git checkout -b Hj-4000 main ]
Switching to branch main [ git checkout Hj-4000 ] and [ git log ]
Git pull on remotes
in the following example, firstly we execute a checkout and switch to the new_feature branch. Then, we run git pullUse cmd: [ git checkout main ] then [ git merge branch-name ]
Create a new repository on GitHub
If you only want to keep track of your code locally, you don't need to use GitHub. But if you want to work with a team, you can use GitHub to collaboratively modify the project's code.To create a new repo on GitHub, log in and go to the GitHub home page. You can find the "New repository" option under the "+" sign next to your profile picture, in the top right corner of the navbar:
After clicking the button, GitHub will ask you to name your repo and provide a brief description:
When you're done filling out the information, press the 'Create repository' button to make your new repo.
GitHub will ask if you want to create a new repo from scratch or if you want to add a repo you have created locally. In this case, since we've already created a new repo locally, we want to push that onto GitHub so follow the '....or push an existing repository from the command line' section:
[ git remote add origin https://github.com/Jama-Hassan/hj-project .git ]
Then [ git push -u origin main ]
Push a branch to GitHub
Now we'll push the commit in your branch to your GitHub repo. This allows other people to see the changes you've made. If they're approved by the repository's owner, the changes can then be merged into the primary branchTo push changes onto a new branch on GitHub, you'll want to run git push origin yourbranchname. GitHub will automatically create the branch for you on the remote repository:.
Pushing new branch to the main branch:
[ git checkout main ] then
[ git push origin my-new-branch ]
Useful when pushing a new branch, this creates an upstream tracking branch with a lasting relationship to your local branch
[ git checkout main ] then
[ git push --set-upstream origin Hj-feature-101 ]
You might be wondering what that "origin" word means in the command above. What happens is that when you clone a remote repository to your local machine, git creates an alias for you. In nearly all cases this alias is called "origin." It's essentially shorthand for the remote repository's URL. So, to push your changes to the remote repository, you could've used either the command: git push git@github.com:git/git.git yourbranchname or git push origin yourbranchname
Pulling via rebase
[ git pull ]: Update your local working branch with commits from the remote, and update all remote tracking branches.[ git pull --rebase ]: Update your local working branch with commits from the remote, but rewrite history so any local commits occur after all new commits coming from the remote, avoiding a merge commit.
Rebasing is prefered over merging. The --rebase option prevents unnecessary merge commits ensuring a linear history. There is a configuration option for pulling with --rebase due to its popularity.
run: [ git config --global branch.autosetuprebase always ]
After running, all git pull commands will be integrated via git rebase instead of git merge.
Let's assume another example that shows how to synchronize with the central repository's master branch using a rebase which will put your local changes on top of what everybody else has already done.
[ git checkout master ]
[ git pull --rebase origin ]
Git Rebase
A Better Git Workflow with Rebase How to Delete a Git Branch Both Locally and Remotely.
In most cases, it is simple to delete a Git branch. You'll learn how to delete a Git brach locally and remotely in this article.
// delete branch locally
[ git checkout develop ]
[ git branch -d localBranchName ]
// delete branch remotely
[ git checkout develop ]
[ git push origin --delete remoteBranchName ]
When to Delete branches
It is common for a Git repo to have different branches. They are a great way to work on different features and fixes while isolating the new code from the main codebase.Repos often have a main branch for the main codebase and developers create other branches to work on different features.
Once work is completed on a feature, it is often recommended to delete the branch.
Deleting a branch LOCALLY
Git will not let you delete the branch you are currently on so you must make sure to checkout a branch that you are NOT deleting.For example: [ git checkout main ]
Delete a branch with git branch -d
For example: [ git branch -d fix/authentication ]
The -d option will delete the branch only if it has already been pushed and merged with the remote branch. Use -D instead if you want to force the branch to be deleted, even if it hasn't been pushed or merged yet.
The branch is now deleted locally.
Deleting a branch REMOTELY
Here's the command to delete a branch remotely:For example: [ git push origin --delete fix/authentication ]
The branch is now deleted remotely.
You can also use this shorter command to delete a branch remotely:
For example: [ git push origin :fix/authentication ]
If you get the error below, it may mean that someone else has already deleted the branch.
[[[ error: unable to push to unqualified destination: remoteBranchName The destination....... ]]]
How To Rename a Local and Remote Git Branch
You are collaborating on a project with a group of people, and you have defined a naming convention for git branches. You created a new branch , pushed the changes to the remote repository, and realized that your branch name was incorrect.Luckily, Git allows you to rename the branch very easily using the git branch -m command.
This guide explains how to rename local and remote Git branches.
Renaming a Local Git Branch
Start by switching to the local branch which you want to rename:[git checkout old-Hj-4000 ]
Rename the local branch by typing:
[ git branch -m new-name ]
At this point, you have renamed the local branch.
If you've already pushed the
Push the [new_name] local branch and reset the upstream branch:
git push origin -u [new_name]
Delete the [old_name] remote branch:
git push origin --delete [old_name] That's it. You have successfully renamed the local and remote Git branch.
How do I change the default branch of a git repository?
The first step is to rename the local "master" branch in your local repositories. You can do that easily with the following command:
$ git branch -m master main
Let's quickly check if this has worked as expected:
$ git status
On branch main
Your branch is up to date with 'origin/master'.
nothing to commit, working tree clean
Rename the master branch on your local machine with the command
[ git branch --move master main ].
Push the new main branch to the remote repository with the command
[ git push --set-upstream origin main].
Renaming the Remote master Branch as Well
In the second step, we'll have to create a new branch on the remote named "main" - because Git does not allow to simply "rename" a remote branch. Instead, we'll have to create a new "main" branch and then delete the old "master" branch.
Make sure your current local HEAD branch is still "main" when executing the following command:
[ git checkout main ]
$ git push -u origin main
We now have a new branch on the remote named "main". Let's go on and remove the old "master" branch on the remote:
$ git push origin --delete master
Easy option::: Go on the GitHub website to change the default branch.
 Printer Friendly Version